Wednesday, March 28, 2012
Monday, December 19, 2011
Been a long time
I have been active printing, not posting. But much more involved with metal working lately.
I made several changes to my printer. See photos.
Upgraded to ReplicatorG 29
Started using Skeinforge 44
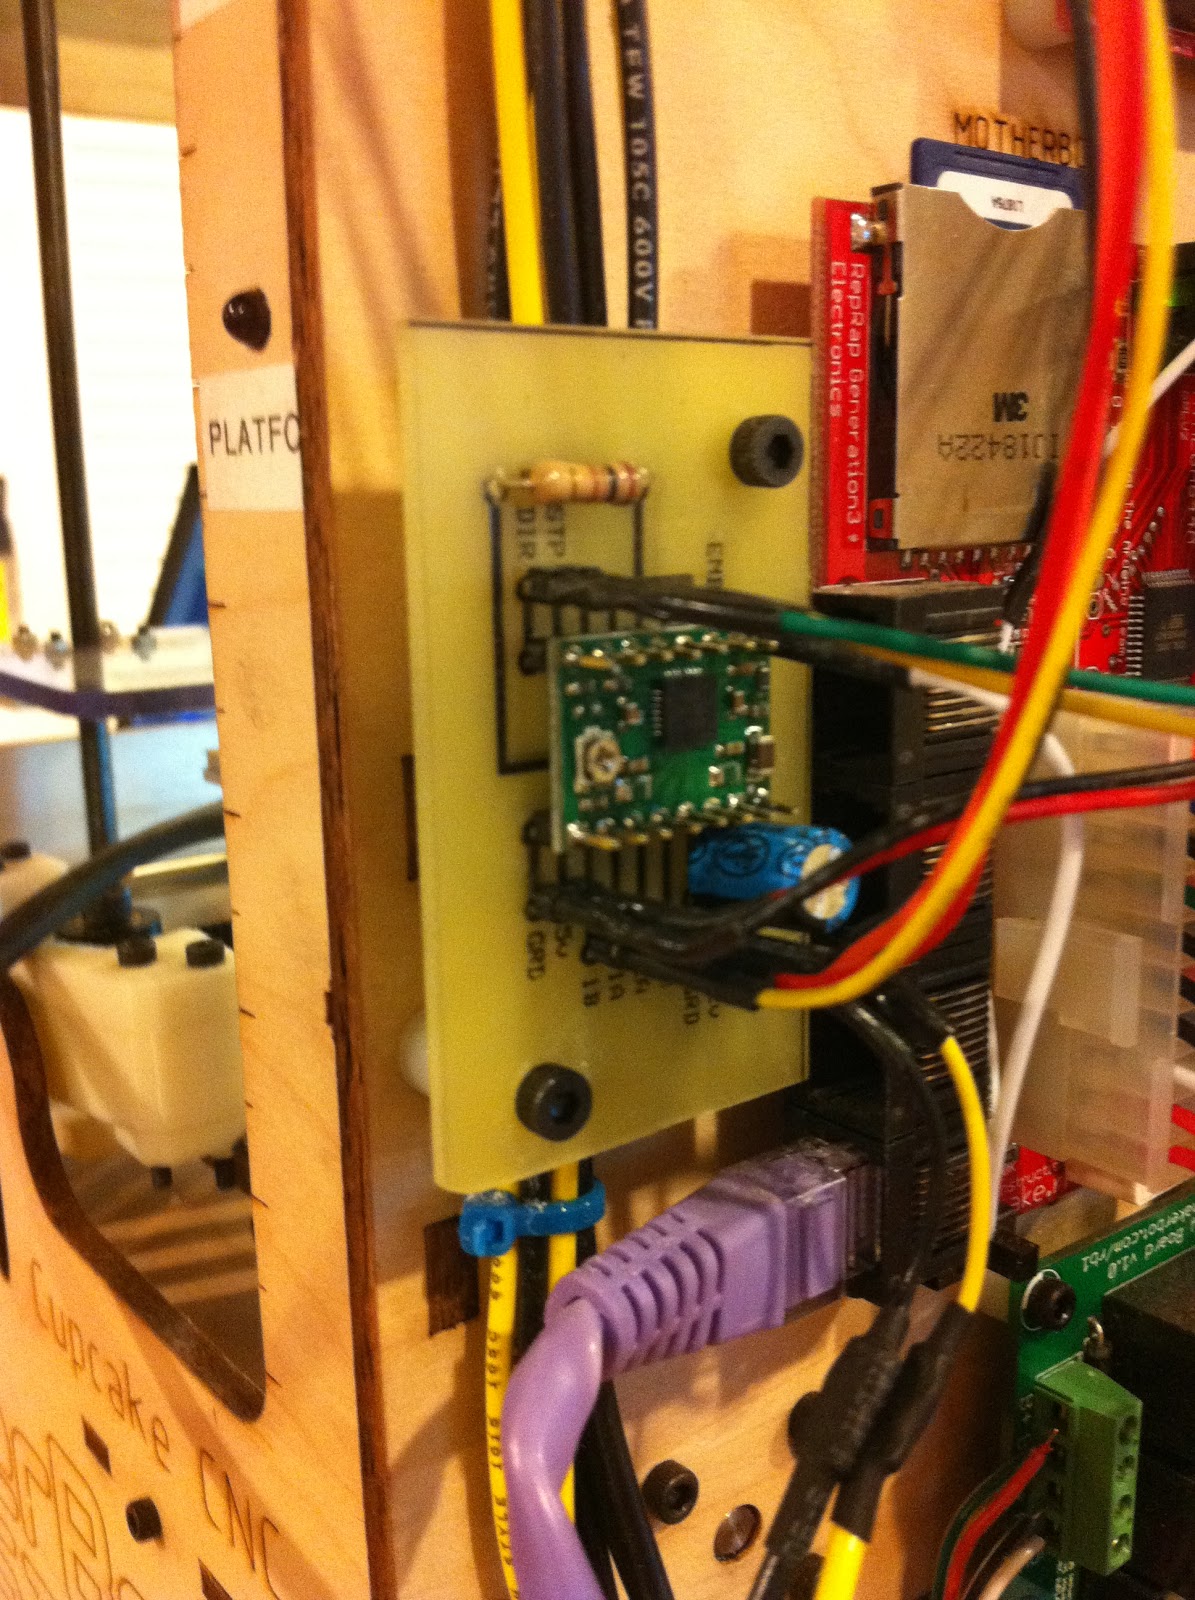
Added hack to motherboard to drive Extruder
Upgraded firmware to 3.1 (motherboard) and 3.0 (extruder)
Changed gears on extruder
Added heatsink to extruder stepper
Printed fan mount for extruder stepper and added fan
Printed LED holder and mounted it to light up platform during builds
Removed a part which was rubbing on X axis
Posted End Stops for a milling machine on Thingiverse.
Posted Carriage Stop for a lathe on Thingiverse.


I made several changes to my printer. See photos.
Upgraded to ReplicatorG 29
Started using Skeinforge 44
Added hack to motherboard to drive Extruder
Upgraded firmware to 3.1 (motherboard) and 3.0 (extruder)
Changed gears on extruder
Added heatsink to extruder stepper
Printed fan mount for extruder stepper and added fan
Printed LED holder and mounted it to light up platform during builds
Removed a part which was rubbing on X axis
Posted End Stops for a milling machine on Thingiverse.
Posted Carriage Stop for a lathe on Thingiverse.


Monday, July 11, 2011
Stepper Extruder
I've been sidetracked on a few projects and just now getting back to printing.
Instead of working on a scanning solution I decided to move on to a Stepper Extruder. There are several out there and the "Wade" one is the most known. I went with a derivative called "Accessible Wade's Extruder by GregFrost".
This particular version did not have a base which fit my printer so I used it as a starting point. I added a base which allowed me to mount a standard MK4 hotend and use the same Dinos used with the Brutstruder. I made some small riser blocks in order to increase the z-axis capacity.
With the Brutstruder I was printing .36 mm layer height at 27 mm/s. With the stepper extruder I am now able to print .30 mm layer height at 30 mm/s.
I used the Brutstruder to print a first stepper extruder and then printed this one using it:

I made a driver using a Pololu A4983 as discussed in a previous post.
I messed up by not breaking out the Enable pin, but I can use the one connecting the Pololu board and it works fine. I fixed the circuit layout and included the corrected version in my previous post. I just haven't gotten around to etching a new board. When I do I'll try and document the process since it is a bit different than what I have seen others do. Here it is from start to mounted finished board.


Sunday, June 19, 2011
Change of Direction
My next project was to work on a scanning option using the David software starter kit. I have made some progress on it but have been diverted in another direction.
I received my new Makerbot (#2662) and the two extra stepper motors. I started looking into different versions of the Wade Extruder and the associated electronics. I decided to go with this version even though the designer has updated it to have a hinged bearing. I like the more solid version with the four screws holding the bearing in place with springs.
For the electronics I looked at the Pololu website and decided to pick up some of these A4983 Stepper Motor Driver Carrier. I also found this drawing here.

From it I was able to layout a circuit board I think will work. I am waiting for the drivers to arrive but here is a drawing of the board. I made it so it fits on a single sided 3x5 board and produces 4 copies. This picture is not actual size but it fits nicely on a 4x6 sheet of photo paper and is easy to transfer and etch. I may put the process of doing this in a future post.

I received my new Makerbot (#2662) and the two extra stepper motors. I started looking into different versions of the Wade Extruder and the associated electronics. I decided to go with this version even though the designer has updated it to have a hinged bearing. I like the more solid version with the four screws holding the bearing in place with springs.
For the electronics I looked at the Pololu website and decided to pick up some of these A4983 Stepper Motor Driver Carrier. I also found this drawing here.
From it I was able to layout a circuit board I think will work. I am waiting for the drivers to arrive but here is a drawing of the board. I made it so it fits on a single sided 3x5 board and produces 4 copies. This picture is not actual size but it fits nicely on a 4x6 sheet of photo paper and is easy to transfer and etch. I may put the process of doing this in a future post.

Tuesday, May 3, 2011
Using Multiply
I found using multiply beneficial for certain prints. Below is the base portion of http://www.thingiverse.com/thing:7850 where I show the results of printing one part alone (left) and one which was part of a group of four (right).
The multiply parameter in Skienforge allows you to take a single part and print a grid of them. This allowed each layer to solidify before the next was added. For a part like this where the stem section is built quickly, the layers tend to melt together and lean as it is printed. By allowing a short time between layers the shape is significantly better.
I seem to recall reading about another parameter which allows this for a single part where basically the printer head "circles" before laying down the next layer. I don't recall what it is but it might be an alternative.

Friday, April 29, 2011
Next Printer
I decided to pick up one of the last remaining "CupCake Ultimate" printers from Makerbot. The price made it worth it for the components alone. I've been toying with building a Mendel for quite awhile in order to increase build capacity. Maybe this is the starting point. I also have some thoughts on just doing a custom build where I extend the dimensions but essentially keep it a Makerbot configuration.
I also ordered two additional steppers assuming I'll be moving to stepper extruders at some point. So I'm not sure at this point what I will do with it but I doubt it will be a straight build. With the quality of print I am getting from my current printer, I'll be in no hurry so it may just sit for awhile until I decide what to do.
My next task is to work on a scanner option.
Wednesday, April 27, 2011
Low Rider completed
I have completed the low rider upgrade and installed it. Pictures of the assembled unit and the installation are below. Also I added a picture of my first print using it. I printed an item I had printed previously for comparison sake (although I used different colored ABS). The quality is up some especially on the waviness of the x axis.
I originally thought I might be able to use larger diameter x rods. Turned out not to be the case.
I changed a parameter while building the Low Rider (Loops-Perimeter-Infill) based on a comment on it's Thingiverse page. I left it this way when I printed my first item and it eliminated the obvious line where the z-axis increments. I will stick with this for awhile and see if I prefer the prints to the previous setting (Perimeter-Infill-Loops) which I believe was the default.
Update: I think I will either go back to (Perimeter-Infill-Loops) or try a different option. I think for prints without overhangs the print quality of the z axis is not as good now.
It will appear in the photos I have it flipped on the x axis from most copies you see out on Thingiverse. It's not a mistake with the photo. I believe I had one of the axis inverted in the motherboard firmware and thus printed mirrored versions of the parts. Since it was consistent and since I have a custom heated build platform it doesn't really matter.


Subscribe to:
Posts (Atom)