I decided to pick up one of the last remaining "CupCake Ultimate" printers from Makerbot. The price made it worth it for the components alone. I've been toying with building a Mendel for quite awhile in order to increase build capacity. Maybe this is the starting point. I also have some thoughts on just doing a custom build where I extend the dimensions but essentially keep it a Makerbot configuration.
I also ordered two additional steppers assuming I'll be moving to stepper extruders at some point. So I'm not sure at this point what I will do with it but I doubt it will be a straight build. With the quality of print I am getting from my current printer, I'll be in no hurry so it may just sit for awhile until I decide what to do.
My next task is to work on a scanner option.
Friday, April 29, 2011
Wednesday, April 27, 2011
Low Rider completed
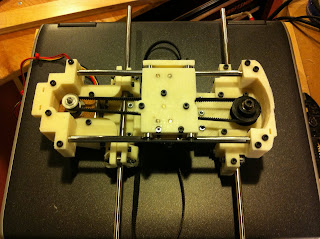
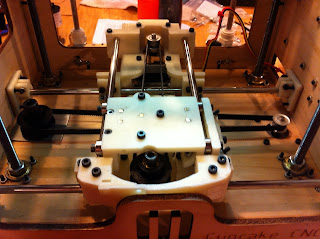
I have completed the low rider upgrade and installed it. Pictures of the assembled unit and the installation are below. Also I added a picture of my first print using it. I printed an item I had printed previously for comparison sake (although I used different colored ABS). The quality is up some especially on the waviness of the x axis.
I originally thought I might be able to use larger diameter x rods. Turned out not to be the case.
I changed a parameter while building the Low Rider (Loops-Perimeter-Infill) based on a comment on it's Thingiverse page. I left it this way when I printed my first item and it eliminated the obvious line where the z-axis increments. I will stick with this for awhile and see if I prefer the prints to the previous setting (Perimeter-Infill-Loops) which I believe was the default.
Update: I think I will either go back to (Perimeter-Infill-Loops) or try a different option. I think for prints without overhangs the print quality of the z axis is not as good now.
It will appear in the photos I have it flipped on the x axis from most copies you see out on Thingiverse. It's not a mistake with the photo. I believe I had one of the axis inverted in the motherboard firmware and thus printed mirrored versions of the parts. Since it was consistent and since I have a custom heated build platform it doesn't really matter.


Tuesday, April 26, 2011
First item on Thingiverse featured.
The first item I posted to Thingiverse was a Swivel Light which I will be using with my next upgrade.
You can find it here: http://www.thingiverse.com/thing:7850.
The day after I posted it I received an email stating "Your Swivel Light thing has caught the eye of a Thingiverse Admin and it is now being featured!"
I thought that was kind of cool and it looks like more people have checked it out and downloaded it because of it.
Friday, April 15, 2011
Next Mod
Next mod is to make a Low Rider.
I have some photos of the parts below. I made a few adjustments before printing these and they seem to have turned out better than some of the parts shown in previous posts. They are printed with 50% infill and 3 layers on each solid surface. The photos are taken after just light cleanup of loose threads and a little sanding where surfaces meet. All holes are as printed. I tried to show flatness achieved in a few shots.
As soon as I receive the bearings and hardware I'll be putting it together.
I intend on beefing up the X axis rods to 3/8". There are some rod mounts which appear to support this. The Low Rider and rod mounts were created by the same gentleman (twotimes). I am assuming I can make them work together but we'll see. I'll update this post as things move along.
 |
| Here is a piece without any cleanup except the final "thread" made when the print head rises at the end of a print. Holes are as printed and not drilled out. |
 |
| Same part from the side. Turned out quite flat. |
 |
| I believe these two parts go together (I haven't really read through the build instructions yet). I did a light sanding where they meet. Again they look pretty flat and fit together nicely. |
 |
| All parts laid out and ready to go |
Sunday, April 10, 2011
Current Setup
Here is my current setup
 |
| The cabinet is made of leftover 1/2" MDF and 3/4" Plywood from other projects. It's on casters so it can be pushed out of the way when needing access to other tools. The shelf folds down and the laptop can be put in a drawer. The spindle is home made and is covered with 1/8" polycarbonite to watch for tangles. It is held on with Velcro and once removed the spindle slides out. The filament is fed through 1/4" tubing. I placed the printer on some "Bench Cookies". They effectively self level (or at least balance) and provide some isolation from vibration. |
 |
| View from front showing X-axis mod using Zydac outriggers and heated build platform of my own design. I also added a couple LED's to show when the extruder and platform are being heated. I have the connection to the platform coming out the front so it can be easily removed in order to make part removal easier. It is also wired with a four conductor connector to make complete removal from the machine possible I have some experience in woodworking and did something during assembly which I had not seen anyone suggest. I glued it together. I left anything which I assumed I would need to access later free of glue, but all the "tab and slot" connections as well as the lengths of board containing them were glued before tightening down the connectors. I also continually checked for square during assembly. I've not actually seen any other printers live to know if it makes a difference, but this one is pretty rock solid and free of racking. |
 |
| Side view. I kept all the electronics on this one side and tried to keep the wiring as neat as possible. I use connectors for the extruder motor and heater so I can easily swap them out. I currently use one of two Brutstruders at any given time. One is used for white ABS and the other for black ABS. |
 |
| Rear view showing Z-axis mod. Here I used a subset of Zydac outriggers along with some 1/4 " rod attached using L brackets and quick connect tubing fittings. I got the idea to use these as I was setting up a filament feed tube. I didn't like the idea of trying to squeeze everything inside the cabinet and since I had a crack in my acrylic plate (as well as a sag), I decided to replace it with polycarbonite and extend it out the back. Things kind of fell in place from there. Of course I also made use of Wobble Arrestors. I plan to make use of this extended back area for another mod later. Although not viewable I am using a Mendel Style Y-axis. I also mounted an LED light fixture close to the print head. The wood got a little hacked up on this one as I removed it to gain some Z movement, not my best work. |
 |
| Here is a circuit board I made up based on Zaggo's design. It uses one resistor and one capacitor which are mounted on the other side. The heated platform itself is below. |
 |
| This is just a sandwich of two aluminum plates which I milled to accept a length of nichrome wire around the outer edge as well as a thermistor in the middle. All the wiring is contained in what is the upper plate and everything is insulated and held in with Kapton tape. The bottom plate has some relief areas milled and has 5 cylindrical magnets installed in the normal places (one is missing in this photo but added later). Then it is all drilled and screwed together before adding a 1/8" sheet of polycarbonite to the surface. You can see the polycarbonite in the second picture in this post. It is back painted with red leaving a center target for setup purposes. It has cross hatching created using a tungstan scribe and engineer's square As you may have guessed if you read the above, I prefer polycarbonite to acrylic. I have at this point gotten rid of all acrylic within the printer. Most of it had cracked and I was doing all I could just to keep the MK4 held together long enough to print an alternative replacement. The polycarbonite on the heated platform works well. I had been using it for awhile when I noticed Nophead had attempted to use it at one point but then seemed to abandon it. I found using 70°C works well but I am going to try pushing it up a bit as a few larger parts recently had a slight warp. |
Wednesday, April 6, 2011
Items printed
Before discussing my machine, mods, settings and so forth I suppose the first place to start is with items I have printed.
These are recently printed with my current setup. I am working on a mod or two to see if I can improve results. I am also working on a scanning solution.
 |
| Screw Cup from Thingiverse |
 |
| Stanford Bunny |
 |
| One of two Brutstruders |
 |
| First OpenScad Design |
 |
| Electrical components |
 |
| Initial assembly |
 | |
| Assembled and ready for mounting and wiring |
 |
| Statuette for first scanning experiment |
 |
| Printed result. |
Subscribe to:
Posts (Atom)